Thursday, July 25, 2013

Creamy Blueberry Pie


With recent supermarket sales and my daughter's love for blueberries, my fridge was overflowing with blueberries.  When I was invited to a luncheon at a friend's house, I thought this would be the perfect treat to bake after seeing a friend's post of the finished product on FB.  
Today we went blueberry picking, and I'm tempted to make the recipe again with the sweet berries we collected!

 This recipe is my adaption of a recipe from allrecipes.com. After reading reviews on the website and talking with a friend who made the pie, I cut back on the sugar (by almost 2/3 cup).  I also used some of my favorite flavor combinations with the addition of lemon zest and cinnamon.  I used my grandmother's cast-iron pan which is about 11 inch across which made for a more spread out pie than in the picture on the website.  Definitely my new favorite blueberry pie recipe- and very easy!


Ingredients:


3 1/2 cups fresh blueberries
1 9 inch pie crust (I used Pillsbury)

For the custard:
1/2 cup white sugar
1/3 cup flour
1/8 tea salt
2 eggs, beaten
1/2 cup sour cream (I used light)
1 tea grated lemon zest

For the streusel:
1/3 cup white sugar
1/2 cup flour
1/4 cup butter
1 tea cinnamon

Directions:

1. Preheat oven to 350 degrees F. Place the blueberries in the pastry shell and set aside. 

2. Combine 1/2 cup sugar, 1/3 cup flour, salt and 1 tea cinnamon. Add eggs, sour cream and lemon zest, stirring until blended. Pour the sour cream custard over the blueberries.
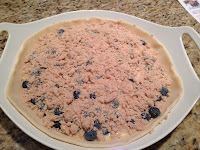
3. In another bowl, combine 1/3 cup sugar and 1/2 cup flour. Cut in the butter with pastry blender until the mixture resembles coarse crumbs. Sprinkle the topping over the sour cream mixture and berries in the pie shell.


4. Bake in the preheated oven for 50 to 55 minutes, or until lightly browned. I waited until the pie crust sticking out around the side got golden brown.  Cool on wire rack. Serve with vanilla ice cream or whipped cream- or BOTH!


Tuesday, July 9, 2013

Shrimp Tacos with Honey Lime Mayo and Mango Salsa

These are great for an easy and fun summer meal.  Start to finish you can take under 30 minutes to create a spicy and lively dish.  Oh and yes, I'm back to blogging with a challenge from my co-teacher to get back into this form of writing this summer.  Hope you enjoy my latest culinary creations!

Shrimp Tacos

pinch cayenne/red pepper powder
1/4 tea salt
1/4 tea granulated garlic
2 tea smoked paprika
2 tablespoons lime juice
zest of 1 orange
1 tablespoon fresh cilantro, chopped finely

16-20 jumbo shrimp (I got mine at Whole Foods for a good price- and they are HUGE!) shelled, cleaned, deveined, rinsed


  • Mix top group of ingredients in a small bowl.
  • Add shrimp to large ziploc bag and top with spice mixture.
  • Shake and smush until all shrimp are well coated
  • Marinate for 15 min-1 hour (more than that the lime juice will start to cook the shrimp)
  • Skewer shrimp using railroad method (not a real name, but one I just made up because I don't know how else to describe it.  I could also say, "see picture").
  • Grill on high for 4 or so minutes per side, turning when slightly browned and deliciously charred.
  • Serve with corn tortillas and toppings such as sliced avocado, grilled red peppers/onions, tomatoes, lettuce, cilantro.  I also recommend serving with honey lime mayo and/or mango salsa (see recipes below).

Honey Lime Mayo
1/4 cup lowfat mayo
sprinkle cayenne
1 tablespoon lime juice
1 tea honey
1 tea paprika

  • Stir well and serve with Shrimp Tacos

Mango Salsa
2 ripe mangoes, chopped
2 ripe tomatoes, chopped
1 tablespoon fresh cilantro, chopped
1 tablespoon lime juice
1/2 tea paprika
sprinkle cayenne
sprinkle salt

  • Stir well and serve with Shrimp Tacos, chips or any other "Fiesta Food"!

Sunday, November 4, 2012

Dave's Birthday German Chocolate Cake

So, this was an all day event, but definitely worth the work if it’s for a special occasion. If you’re prepared for that, you almost forget the work because of how delicious it is. Your guests will probably rave even more if you make sure to share that tid-bit….mine certainly did! Also, sorry for the lack of pictures...I was so consumed I forgot! Hopefully my directions in red will create enough info.  Let me know if you have any questions.
 
German Chocolate Cake With Coconut-Pecan Cajeta Frosting

Recipe courtesy Bobby Flay for Food Network Magazine
Prep Time: 1 hr 35 min
Cook Time: 1 hr 50 min
Inactive Time: HOURS! (Don’t say I didn’t warn you J
Level: Difficult
Serves: one 4-layer cake


Ingredients

For the Cake:

12 tablespoons (1 1/2 sticks) unsalted butter, at room temperature, plus more for the pans
2 1/4 cups all-purpose flour
3 teaspoons baking powder
3/4 teaspoon baking soda
3/4 teaspoon salt
1 cup plus 2 tablespoons unsweetened Dutch-process cocoa powder
1 1/2 cups firmly packed light muscovado sugar (used light brown sugar)
1 1/2 cups granulated sugar
1 1/2 cups strong brewed black coffee, at room temperature
1 1/2 cups buttermilk (added white vinegar to whole milk)
3 large eggs
2 teaspoons pure vanilla extract
 

For the Frosting:

1 3/4 cups whole milk
1 3/4 cups unsweetened coconut milk
1 cup goat's milk or additional whole milk (used additional whole milk)
3/4 cup plus 1 tablespoon granulated sugar
Seeds scraped from 1/2 vanilla bean
2 tablespoons light corn syrup
2 egg yolks (see comments below)
2 tablespoons unsalted butter, cut into small pieces, cold (only had salted, so omitted 1/8 tea salt- below)
1/2 teaspoon pure vanilla extract
1/8 teaspoon salt
2 teaspoons coconut rum (optional) (didn’t use)
1 1/4 cups coarsely chopped pecans, toasted (burned my first round, so only  used about ¾ cup, which was plenty)
1 1/4 cups sweetened shredded coconut, toasted


For the Ganache:

8 ounces bittersweet chocolate, finely chopped (had read reviews that it was too bitter, so I used 4 oz german choc, 3 oz milk choc, 1 tablespoon unsweetened Dutch-process cocoa powder)
2 tablespoons light corn syrup
1/2 cup sweetened shredded coconut, toasted, for garnish
1/4 cup chopped pecans, toasted, for garnish
Coconut Whipped Cream, for serving (couldn’t bear to make anything else so we served with Vanilla ice cream)
 

Directions

Make the cake: Position a rack in the center of the oven and preheat to 325 degrees F. Butter two 9-inch-round cake pans and line the bottoms with parchment paper. Whisk the flour, baking powder, baking soda and salt together in a medium bowl.

Melt the 12 tablespoons butter in a medium saucepan over medium heat. Whisk in the cocoa powder and cook for 1 minute. Remove from the heat, add the muscovado and granulated sugars and whisk until the sugar has dissolved. (sugar didn’t dissolve until liquid ingredients were added)

Add the coffee, buttermilk, eggs and vanilla extract and continue whisking until smooth and just combined. Add the dry ingredients and stir until the batter is smooth.

Divide the batter evenly between the prepared cake pans and bake until a toothpick inserted into the center comes out with a few moist crumbs attached, 40 to 45 minutes. Let the cakes cool in the pans on a wire rack for 20 minutes. Invert the cakes onto the wire rack and let cool at least 1 hour before frosting. (cake was ready in 40 min, easily came out of the pan- crumbs tasted great! Start frosting while cake is cooking)
 

Here comes the fun part…Make the frosting: Combine the whole milk, coconut milk and goat's milk in a small saucepan and bring to a simmer over low heat. Keep warm while you prepare the caramel.

Combine the sugar and 1/4 cup water in a medium saucepan over high heat and cook without stirring until a deep amber color, 8 to 10 minutes. (my first batch burned, so I had to start over.  Do NOT leave the stove- to change a diaper or give a bottle, like I did- and keep a close eye on this.  It goes from perfect to burnt in 10 sec!)

Slowly and carefully whisk in the warm milk mixture and continue whisking until smooth. Add the vanilla seeds and corn syrup. Bring to a boil, (mine overflowed here- again do NOT leave the stove!), reduce the heat to medium and cook, stirring occasionally with a wooden spoon, until the sauce is reduced by half and the consistency of a caramel sauce, about 55 minutes.(This sounds easy, finally you can get something done….not so!  I stirred every 5 or so min for the entire hour.  The sauce had reduced but it was not thick like a caramel sauce.  Around 75 minutes I decided to take matters into my own hands, and added 2 egg yolks to get it thick.  Worked like a charm and the sauce was now perfect!)

Remove from the heat and whisk in the butter, vanilla extract, salt and rum (if using). Transfer the sauce to a medium bowl and stir in the pecans and shredded coconut. Let the frosting cool to room temperature, stirring it occasionally, before frosting the cake.

Make the ganache:(*This was listed later in the original recipe, but it should be made before you start to assemble.)  Bring the cream to a simmer in a small saucepan. Put the chocolate in a medium heatproof bowl, add the hot cream and the corn syrup and let sit for 30 seconds. Gently whisk until smooth. Let sit at room temperature for 10 minutes.


To assemble the cake, slice each cake in half horizontally. (easiest way to do this is to use a serrated knife and score around the outside so you make the layers even.) (Cut 3-4 strips of parchment paper and cover rim of plate you’re going to serve on.  Then…)Place 1 cake layer (rounded part down) on a cake round and spread one-third of the frosting evenly over the top. (leave about ¾ in border around edge because it will spread out when the layer stack on.) Repeat to make 3 layers, then top with the remaining cake layer, top-side up. (end with flattest layer on top)

Set the cake on a wire rack placed over a rimmed baking sheet. (I was not about to move the masterpiece now but it was fine because I had the parchment paper to catch all of the gooey deliciousness!  Your pre-cake treat….and you certainly deserve it after all the work this takes!!) Pour the chocolate ganache over the cake, letting the excess drip down the sides. Sprinkle the top with toasted coconut and pecans. Let sit at room temperature for at least 30 minutes and up to 4 hours before slicing.

Slice the cake and top with a dollop of Coconut Whipped Cream.(I used Vanilla Ice Cream- yum!)


Wednesday, July 4, 2012

Grilled Tequila Lime Chicken and Tomato Bean Salad

This easy and light dinner is a definite summer winner- even when your husband first suggests ordering Chinese and makes a face when you tell him what you were planning on making. Adding a margarita to the meal is never a bad idea.  It quickly turns that face into, "Wow babe, great dinner!" 

Cheers and Happy Summer!


Tequila Lime Chicken

Juice of 1 lime
1/4 cup chopped cilantro
1/4 cup tequila (I used Jose Cuervo)
1/4 cup pre-made margarita mix (I used a natural kind to keep it less sugary...plus it's what I had in the house)
salt, pepper
2 boneless, skinless chicken breasts, sliced lengthwise to thin
bunch of scallions
extra virgin olive oil


Combine lime, cilantro, tequila, salt and pepper in shallow dish.  Add chicken, turning to coat. Marinate for 1 hour- and not much more because the lime and booze will do funky things to your chicken....like start to cook it.


Coat scallions with squirl of EVOO, salt and pepper.


Grill chicken, turning once on medium, until juices run clear. Mine took about 6-8 minutes on each side. Add scallions to the grill after you flip the meat for about 2 minutes on each side. They will turn limp and brown, getting sweet, very quickly.

Serve with easy salad below...


Tomato Bean Salad

1 ripe tomato (I used 1 medium "tomato on the vine"), chopped
1/2 can small white beans, rinsed well
Juice of 1 lime
1/4 cup chopped cilantro
1/2 red bell pepper, chopped
salt, pepper
swirl of EVOO (I had garlic flavored, but any good quality will work)


 Combine ingredients, mix lightly, and leave to marinate for at least 1-2 hours.
Serve with chicken above or another summer dish. 
This would be great as a side dish at a BBQ in a larger quantity.

Sunday, March 18, 2012

Frozen Mint Cookie Brownie Bars

So I needed a St. Patty's Day themed recipe and saw this one in pinterest, http://www.ourbestbites.com/2012/03/mint-chip-ice-cream-brownie-squares/.  But of course, I made some changes to cut out steps, adjust to my taste and even remove some fat.  Very minimal skill required, but does require some time to freeze in between steps.
Ingredients:
  • 1.5 quart of mint cookies 'n cream frozen yogurt (the original recipe called for mint choc chip ice cream but I liked this better- plus the Turkey Hill brand was on sale)
  • 1 box Ghiradelli Chocolate Supreme Brownie Mix  (or any other good box kind that's for a 9x9 pan)
  • 1, 8 oz tub Cool Whip (I used lite)
  • 20 mint Oreos (the original recipe called for regular oreos, but then adds peppermint extract, but I thought this would be a better way to cut out that step).
Here we go:

1. Make brownies according to directions on box in a 9x13 pan lined with foil (the box calls for 9x9 but you want it to be a thinner layer than normal brownies).  Bake until slightly underdone to keep them chewy. (I checked them at 10 min less than the suggested 9x9 time, then continued to cook them 5 more min.) Cool on counter.

2. Put a 1.5 quart of mint cookies 'n cream ice cream on the counter on a plate, stirring every 10 minutes to evenly thaw. Put Cool Whip in 'fridge to thaw.

3. When brownies are cool and fro yo is melted (should be like frosting consistency), spread an even layer of the fro yo over brownies.  Cover with plastic wrap, then foil and place FLAT in the freezer for a few hours.  (I had mine slanted at first and it wasn't pretty :)

4. Remove frozen deliciousness from freezer, and spread Cool Whip over minty layer. 

5. Crush (but don't polverize) Mint Oreos in zip lock bag into about 1/4 Oreo pieces- you want to maintain the green filling color.  Evenly sprinkle Oreos on top.  Cover with plastic wrap then foil again, and place back into the freezer for at least 1-2 more hours.

5. Remove from freezer about 10 minutes before serving.  Pull up masterpiece from pan using foil lining and (easier with a friend's help) remove foil, dropping back into 9x13 pan.  Cut up and serve!

Friday, July 1, 2011

Patty Pan Squash

Now that summer is in full swing, I have nothing but time on my hands to get the blog up and running again.  I've been cooking, taking photos, and writing down my recipes, but actually getting them up here has been the challenge.  I really have no excuse now, and with the amount of times I've been to the Farmer's Market already this season, I have plenty to write about. Please share your comments and suggestions to help make this a great shared cooking experience for all of us!

This first post back is a simple preparation for a great Farmer's Market find (maybe you could find them at your own grocery store, although I've never seen them there)- patty pan squash.  Uncooked, they look like yellow acorn-shaped gords, but have a similar taste to a yellow squash or zucchini.  This recipe is an easy way to make them on the grill, although you can use an oven for a similar effect if a grill is not available.

For two people, use 3 large squashes (that word looks weird, but I Googled it :) Large would be about the size of a lemon.
Cut off the stem and bottom end.
Slice each squash into 1/4 inch rounds.
Make a mixture of 3 tablspoons extra virgin olive oil, 3-5 leaves of freshly chopped basil, salt and pepper.
Rub mixtures over slices.

Let sit for up to 1 hour.

Grill on medium, checking regularly to ensure they are getting nice grill marks but not scorching. I did about 8 min on the first side, then about 4-5 on the second.

Serve with any meat or pasta dish. Enjoy this summer delight!

Tuesday, May 10, 2011

Pulled Pork

This is a great recipe for a slow-cooker meal that you prep in the morning or the night before and then just let cook.  Super easy and delish!

Combine the following ingredients in a slow-cooker:
1 sliced med-large white onion
1 cup ketchup
1/2 cup cider vinegar
2 tablespoons tomato paste
1/4 cup mustard
1/2 cup brown sugar
2 tablespoons sweet paprika
1 teaspoon red chili pepper
1/4 cup honey
2 teaspoons salt, pepper
2 tablespoons garlic powder

with:

3-4 pound boneless pork butt or shoulder

Turn cooker to LOW and simmer with the lid on for 8-10 hours.  Resist the urge to lift the lid and steam your face in the yummy goodness. 

After the time is up, use a large pronged fork to shred the meat apart.  If you have a lot of extra sauce, you can remove the meat, turn the heat up to HIGH on the slow-cooker, and boil the sauce until it thickens.  Then, add the meat back in, tossing to warm and soak up the sauce. 

Serve on buns with pickles and fries or potato chips.


Monday, March 28, 2011

Night 1: The Ham

So, around these parts, when you spend an obsene amount of money before Christmas you earn a "free" gift from the grocery store.  This year, I decided on a 15 pound ham.  I then decided to put it in the freezer and leave it there until my husband forced me to cook it and make room for important products, like fancy bacon from Wisconsin (Nueske's is the company if you're interested in changing your life).

Anyway, the ham finally came out (on Oscar night, although there is no pig to movie connection that I can think of) and here is the debacle that followed...

Night 1: The Ham

Unwrap the ham and cut off any large chunks of fat.  This is disgusting, but you'll be happy you took the time to do this.

Put ham in a large baking pan and cut diagonal lines to create a checkerboard pattern.  Spike in whole cloves where lines meet.

Bake according to package directions.


The Glaze
1 cup water
1 packet boullian
(or substitute the above for 1 cup chicken broth/stock)
10 figs, halved with hard stem removed
1/2 red onion, roughly chopped
1 tablespoon fresh or 1 teaspoon dried thyme

In a medim pot simmer on medium for 5 minutes. 

Add
1/2 cup brown sugar
1/4 cup honey

Stir until dissolved.

Place liquid in food processor and add
2 tablespoons apple cider vinegar
1 tablespoon stone grain mustard (or a spicy mustard- no yellow crap)

Pulse until figs and onions are finely diced.  Set aside on counter.


With 1/2 hour remaining on recommended time, brush glaze on ham and leave uncovered to crisp and carmelize.  Serve with your favorite potato and veggie.

*See following posts for what to do with all of the leftovers!

Thursday, March 10, 2011

Jambalaya and Toasted Parsley Rice

Our Fat Tuesday meal was a great success! I used a combo of a few online recipes and some of what I remember from my own trip to New Orlearns post-Katrina.  This meal wasn't served by teachers in evening gowns to a bunch of sweaty 24 hour car-bound New Yorkers, but the taste was still there:) 

In celebration of an area of our country that has survived so much. 


Jambalaya
1 red onion, chopped
1 red pepper, chopped
2 stalks celery, chopped
3 strips of bacon, chopped
2 bay leaves
1/2 teaspoon red pepper
1 teaspoon ancho chili powder
2 cloves garlic, chopped
1 teaspoon oregano
1/2 teaspoon thyme
1 teaspoon paprika
salt/pepper

Cook in large dutch oven (or large pot) in olive oil on med-low until veggies are soft- about 10-15 minutes.


2 chicken breasts, chopped
1 1/2 cups shredded ham
1 28 oz can diced tomatoes

Add above ingredients and simmer for 45 minutes with cover on. 


1/2 pound shrimp, peeled, deveined, tails removed

Add shrimp, stir, remove from heat and cover immediately.  Let sit for about 5 minutes until shrimp are just pink.  Serve with Toasted Parsley Rice.


Toasted Parsley Rice
1 tablespoon butter
1 1/2 cups brown minute rice

Melt butter in small pot on med-high heat.  Add brown rice and stir constantly for 4-5 minutes, toasted.  You should smell a nutty scent.

1 1/2 cups chicken broth
handful of chopped parsley

Add broth and parsley.  Cook on med-low for 5 minutes covered.  Let sit for 5 minutes covered.  Check for doneness.  If rice is still hard (mine was) add a little more chicken broth and keep on lowest flame covered.  Check every few minutes until rice reaches desired consistency.

Thursday, February 24, 2011

Who's Cooking??

A note from the author:


Lately I've been hearing a lot of, "Hey, I got a great idea from your blog!" or "I checked out the blog- looks good!" but none of these people seem to be "Followers". It got me thinking- how many people are out there reading without me even knowing it?

So here's my request: If you visit often, or even stop by occasionally, please become a Follower (click Follow over to the left) and show me some love. Keep me cooking :)

Thanks and happy eating!
-Andi :)


Wednesday, February 23, 2011

Braciole

This is a wonderfully tender (when done right) rolled steak cooked in and served with your favorite Gravy (aka Red Sauce).  It's a bit labor-intensive, but certainly worth the work! This is a take on my grandmother's recipe...ironically a side dish that as a kid, I never liked.

Start by making the filling:
1 portugese roll
2 large cloves garlic
1/2 cup packed flat leaf parsley leaves, washed
1/4 cup finely shredded parmesan reggiano (optional but delicious)

Preheat oven to 375.  Rip up the roll into bite-sized pieces and pulse in the food processor until you have coarse crumbs.  Remove and spread out on small baking tray.  Drizzle about 2-3 tablespoons olive oil over crumbs, toss, and bake for 5-8 minutes or until just browned.


While crumbs are baking, pulse parsley and garlic in food processor until both are finely chopped.  Sprinkle over toasted breadcrumbs.  Grate cheese on top as well, mixing all ingredients together on warm pan.  Let rest. (This whole process can be skipped and substituted with Italian Breadcrumbs from the can, but it's SO much tastier and healthier to do it this way!)

1 pound thin cube steaks

Spread steaks on plastic or glass cutting board and top with wax paper or a large ziplock bag.  Pound each steak to 1/8" thick using a rolling pin or flat side of a meat tenderizer (if you're fancy and have one of those.)  Me, I beat the hell out of them with the bottom of a heavy pot.


Cut steaks into equal sizes, about 3"x3".  Cut 6" lengths of string (2 per slice) now when your hands are clean.  Spoon 1-2 teaspoons of breadcrumb mixture over each slice of meat, patting down.  Tightly roll up each piece, starting with the pointy end first.


Tie 2 pieces of string, one at either end, to secure the roll.  I had about 1/2 cup of extra breadcrumbs that I stored in a tupperware in the fridge.


About 2 hours before you're ready to eat, brown the rolls in olive oil in a frying pan on med-high on the top of the stove.  Add them to the gravy. 


1/2 cup white wine

Add white wine to the pan and scrape all of the yummy brown bits from the bottom of the pan.  Add this to gravy as well.  Simmer on low for about 2 hours.

Serve in gravy with macaroni, and crusty garlic bread.

Tuesday, February 22, 2011

"Gravy" (The red kind)

Let me start by saying this is not a "quick, weeknight meal" you can just throw together.  Be warned.  But also know that if you take the day to do this, step by step, giving it time to simmer and giving your family time to smell it all day, you will be handsomely rewarded at the end of the night.  So, roll up your sleeves and channel your inner Eye-talian. And yes, I call it gravy...deal with it!

(This should go on the stove by 1pm if you're having a 6 or 7pm dinner.)
1 small onion, chopped
1 rib celery, chopped
1 large carrot, chopped
2 large cloves garlic, minced
1 teaspoon salt
1/2 teaspoon pepper

Saute veggies in 2 tablespoons olive oil over med-low heat until veggies are soft- about 10 minutes.

2 28 oz cans tomatoes (I do 1 can chopped, 1 can whole)- San Marzano are the BEST!
1 6 oz can tomato paste

Add tomatoes plus 1 large can of filtered water. 


Simmer for 2-3 hours on low. Then, using a stick blender, pulse to eliminate chunks. 

Continue to cook for 2-3 more hours, adding more water as necessary. Keeping the lid on will add moisture to gravy, making it thinner; taking it off will cause water to evaporate, making it thicker.  Throughout the cooking time, adjust the water amounts and lid position to maintain desired consistency.

Serve with macaroni, braciole (see next recipe) and some crispy garlic bread.

Tuesday, February 1, 2011

Swiss Chard, Sausage and Bean Soup

This a great wintery soup and lots of ingredient substitutions can be made (see Meal Modifications below). The nutmeg is a perfect match for the dark, leafy greens and gives you an unexpected flavor.  This makes a huge pot with plenty of leftovers.

Ingredients:
6 sweet sausage links, casing removed
1 medium white onion, chopped
1 bunch swiss chard, washed, stems removed and chopped
5 mushrooms, sliced
2 cloves garlic, chopped
pinch nutmeg
1 teaspoon thyme
1 teaspoon salt
2 teaspoons pepper
48 ounces chicken broth
1 can red kidney beans, strained and rinsed
1/2 box ditalini pasta

In a large pot, cook sausage until brown, breaking it up with a wooden spoon into small pieces.  Add chopped onion and saute until  lightly browned and soft.  Add swiss chard, mushrooms, garlic, nutmeg, thyme, salt and pepper. Stir to combine and cook until greens wilt and soften. Then add beans.    

In the meantime cook pasta in pot of salted water until al dente (still a little hard, since it will continue to cook in the soup).  

Add chicken broth and simmer.  Add cooked pasta just before you're ready to eat, as it sucks up a lot of the moisture from the broth.

Serve with crusty bread and grated toscano cheese.

Meal Modifications:
*If you're not a pork eater, substitute chicken or turkey sausage.  Or leave the meat out completely.
*Escarole or kale could be used instead of swiss chard and will produce a similar leafy and bitter taste.
*Chicken stock can be substituted for the chicken broth or vegatable broth could be used.
*Any small pasta will do (shells, orzo, pastina, etc.) if you don't have ditalini.